Work with your contacts without leaving a Trello card
Get Started with Contalist
This guide is going to give you a quick tour of the Contalist PowerUp. Let's get started with a simple use case.
Use Contalist to manage your clients in a card
If the card is for an order, it means you can add the client to its order, and get a simple CRM inside your order card
Imagine you are a business owner and are using Trello to track your orders. Now you get an order from your client Chris, so you create a card for it with a name like '#24062801 - Some awesome product'. To store the client's information, you may fill Chris's name, phone number and shipping address into the card's description...
Wait, what if Chris place another order later? Copy and paste Chris's information would be tedious and error-prone. Now let our PowerUp to help.
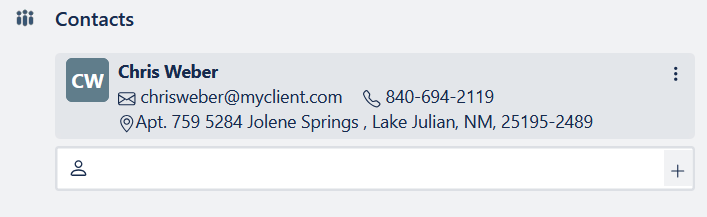
With our PowerUp enabled, you will see a Contacts section in your order card. It may look like this.
You don't need to copy & paste your client information anymore. Just type something like 'Chris' in the search box. It will list your clients with Chris in its name. Then you can click on the client to add him to your order as the client in this case.
No client named Chris found?
This means Chris hasn't been added to your client database. Hit the Enter key or the plus button at the end of the search box to create a new client Chris.
If you already have a list of clients, you can import them into our app. Check it here on How to import contacts.
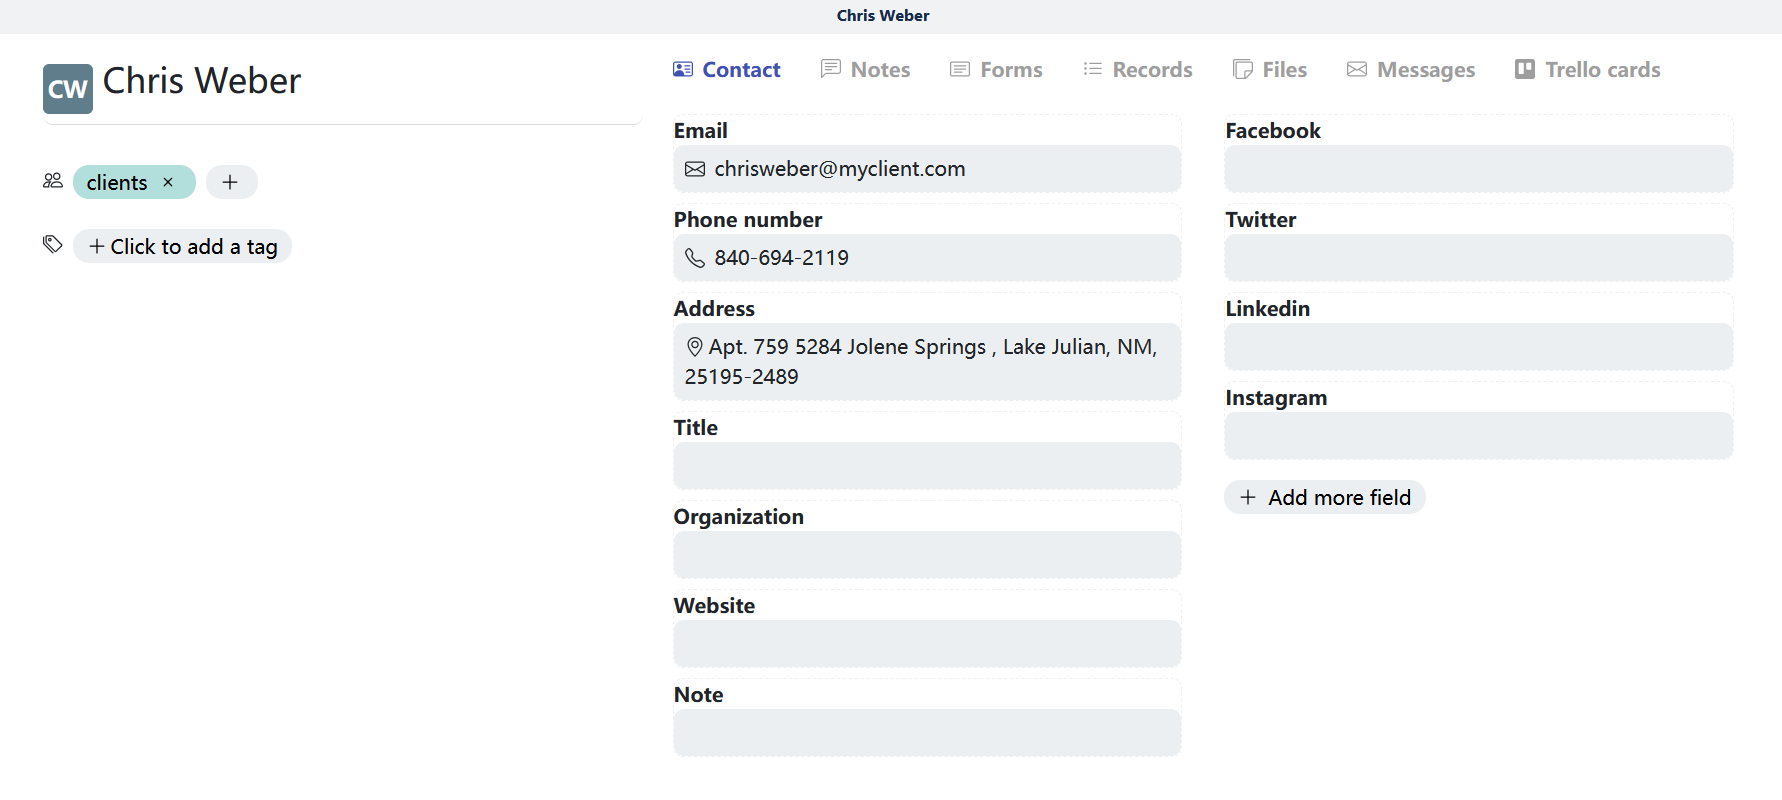
After adding Chris to the card, the contacts section will look like this
You can view Chris's profile by clicking on Chris' name in the card. It will open the contact page, in which you can find or edit information like email address, phone number, address, website...
Even more than that, you can add notes and files, create custom forms to store whatever information you need for your business.
Congrats!
If all you need is to add contacts to your cards, and manage their information easily, it's all set.
👇 Continue to read if you want try more exciting features.
More features to help
Before trying the awesome features, you need to switch our PowerUp to Full version. If you have added our PowerUp to your board and played with it, you may have noticed our PowerUp has two versions
Lite version
The Lite version is ready to use and easier to get started. By default you start with the Lite version when adding our PowerUp to your board
Full version
More features to help you manage your contacts and send messages to contacts, but some setup work is required before you can use it
Here is a list of the difference between Lite version and Full version
| Features |
😺 Lite version
Ready to use, no setup required
|
🦁 Full version
More features, need to do some setup
|
|---|---|---|
| 🟢 Add contacts to card
Add contacts/clients/contractors/whatever to your cards
|
✅ | ✅ |
| 🟢 Manage contact information
Store contact data in one place. You can also store whatever information you need in custom forms, notes, files, etc.
|
✅ | ✅ |
|
🟢 Group contacts by roles
Assign roles (for example, client, designer and contractor...) to your contacts
|
✅ | |
|
🟢 Send messages with actions
Create actions to send personalized messages from templates
|
✅ | |
| 🟢 Automation
Schedule messages or send messages when card is moved
|
✅ |
To switch to the Full version, click the Contalist board button (a button with an icon like this ![]() , and you can find it somewhere before the Power-Ups button), then choose About Contalist.
, and you can find it somewhere before the Power-Ups button), then choose About Contalist.
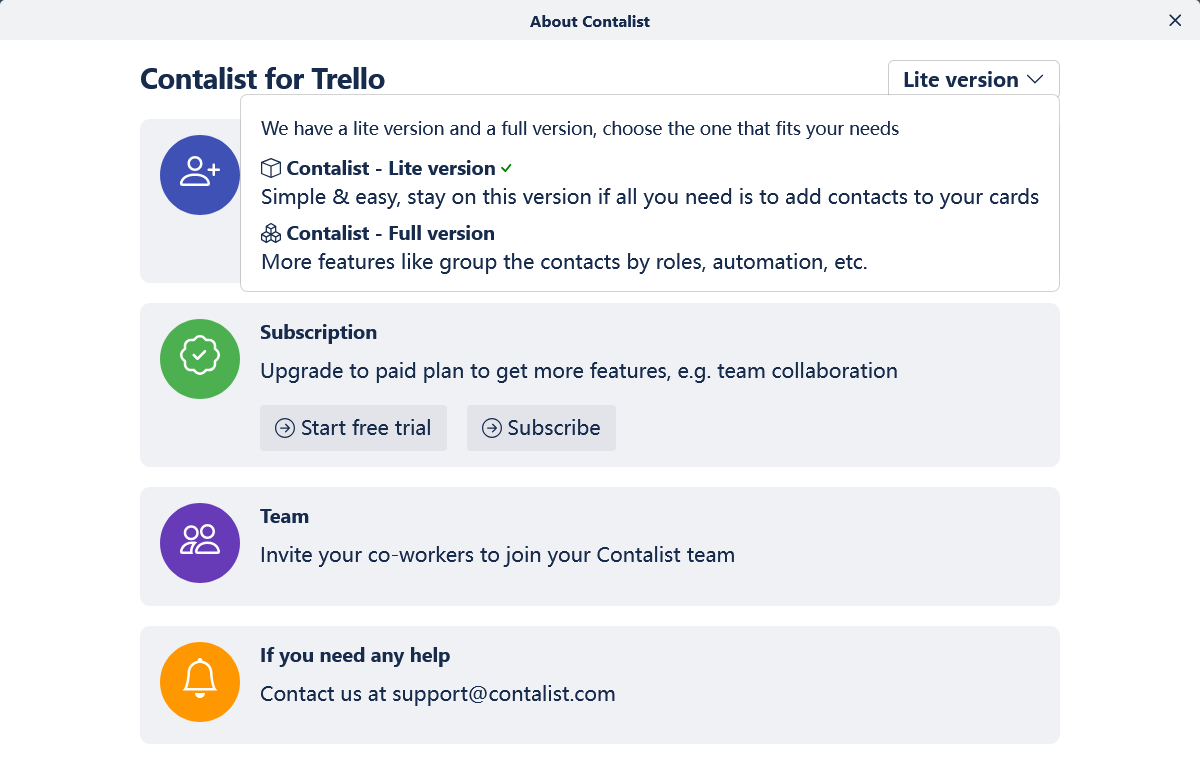
Click the Lite version button in top right corner, and choose Contalist - Full version to switch to it. Now you are with the full version, and can close the popup.
To explore the new features, let's start with contact roles.
Group your contacts by roles
Assign different roles to the contacts in my card
I want to assign Chris's order a coordinator, which will be my co-worker Diana.
First, we need to create the roles, Client and Coordinator, Client for Chris, and Coordinator for Diana (if you open the card now, you will see a message saying you haven't create any role yet).
Click the Contalist board button to open the dropdown list, then choose Setup to open the setup page. This page is where all the settings are done.
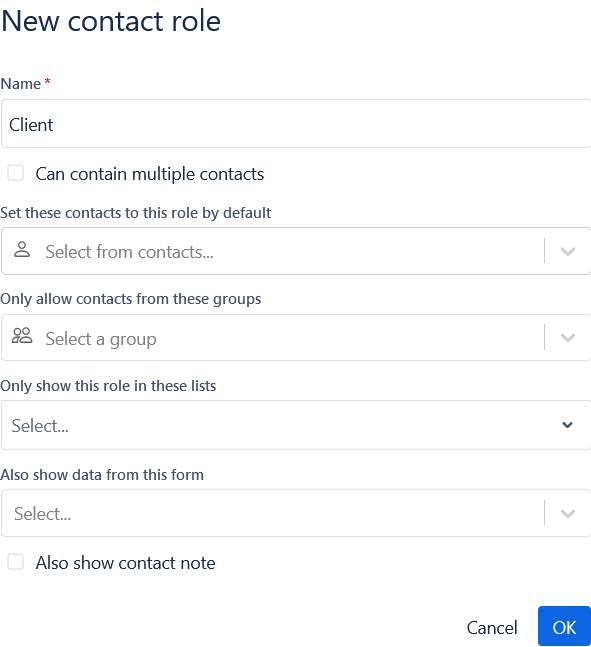
In Contact roles tab, click the Create a role button to open the new role form. Fill the role name with Client, and click the OK button. Client role is created.
Do it again for Coordinator. Now open your card, add Chris to it, and click the plus icon after Chris's name to assign Chris to the Client role. It will look like this
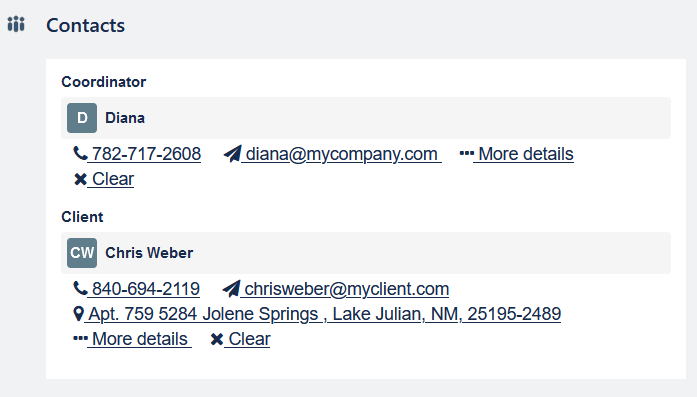
Don't worry if your Chris or Diana doesn't have an email address, phone number or address listed. You can click their name to open the contact page to edit their information and add the missing information.
Contact role form explained
| Field | Description |
|---|---|
| Name | Name of the role |
| Can contain multiple contacts | Check this if you will add multiple contacts to the role |
| Set these contacts to this role by default | Set some default contacts, so you don't always need to add a contact to the role. |
| Only allow contacts from this group |
Set this to some groups if only contacts from the groups should be added to the role For example, you can add Diana to the Co-worker contact group, and set this field to Co-worker. Then when you search for Diana, only your co-worker Diana will pop up. Other Dianas or Chris will not be set to this role |
| Only show this role in these lists | It's possible to hide the role in some lists and show it only in the target lists |
| Also show data from this form | Show the data for the specified custom form. When a contact is added to a role, our PowerUp will show its name, email address, phone number, etc. You can also create custom forms to store extra information and tell us to show it under the contact |
| Also show contact note | Similar to the above field. Check this to show the contact's note |
Do I need to set it up for every board?
Your settings for contact roles (and also actions, automation) will be apply to the current board. If later you add this PowerUp to another board, you need to do the setup again.
If you have large number of boards to set up, you can contact us for help.
Send messages easily with actions
Send a confirmation message to client about the order
Generate an email message from a template to Chris, confirm his order, and maybe ask for some more information.
What is an action?
An action (or you can call it shortcut) is a special button, located under the contacts in your card, and it lets you send messages from templates with just one click.
For example, to send Chris a 'Thanks for order' message, you can create an action - Send thanks for order. When you click the action button in the order card, and our PowerUp will generate an email message from the template you specified and send it to Chris.
Check How to create message templates for information on templates.
To create an action, open the Setup page and click the Actions tab. You may be asked to do authorization if you haven't give us the authorization to access your Trello card. We need to access your Trello card to retrieve, for example the card title, then we can insert it into your message templates.
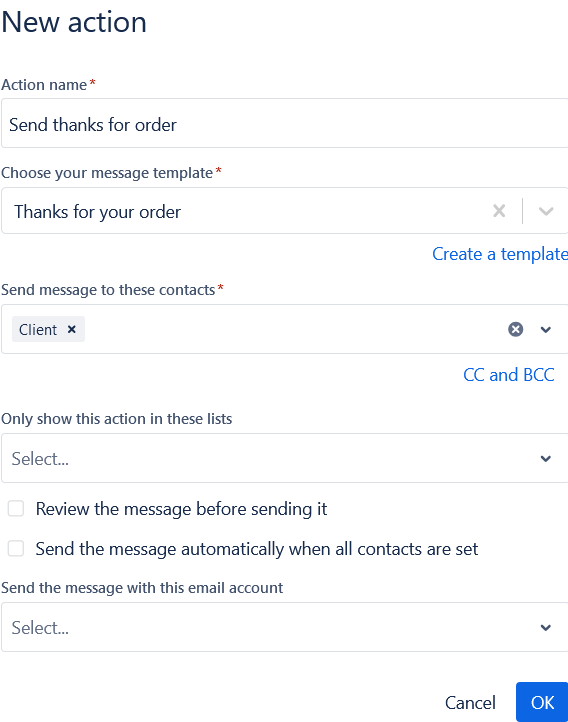
Click the Create an action button to open the new action form. Give your action a name, for example Send thanks for order, then choose your message template for the message template field (if you need a new template, click Create a template link to create one in our web app). In Send messages to these contacts, choose the contact roles that your messages will be sent to. Click OK button to save it.
Action form explained
| Field | Description |
|---|---|
| Name | Name of the action |
| Choose your message template | We will generate personalized messages from this template |
| Send message to these contacts | Choose the contact roles that the message should be sent to. And you can add more recipients with CC and BCC. |
| Only show this action in these lists | It's possible to hide the action in some lists and show it only in the target lists |
| Review the message before sending it | Check this if you want to review the generated message before sending it. Messages that need your inputs will always be reviewd before being delivered. |
| Send the message automatically when all contacts are set | Check this if you want the message to be automatically sent after you have added contacts to all the selected roles |
| Send the message with this email account | You can set up multiple email accounts and use them for different type of messages. Leave it blank to use your primary email account |
Now open a card, you will see your action button under the contact fields, something like this.
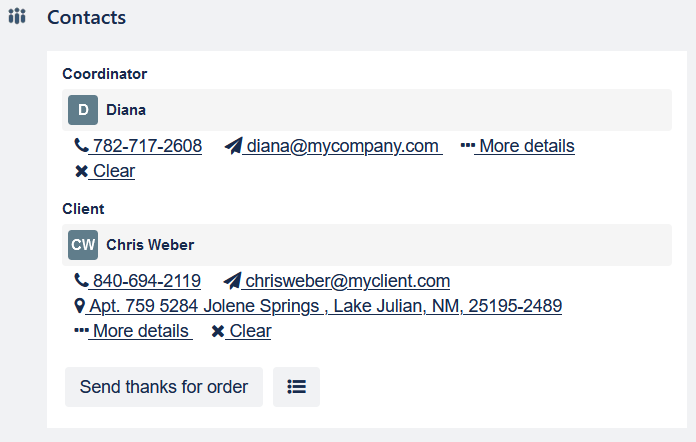
After you click your action button, Contalist will generate a message from the template and send your message to the contacts you selected. In your template, you can insert placeholders for various information, for example the contact's name, the Trello card title, description, due date and even custom fields.
Action required before sending a message
Before sending emails, you need to set up an email account at your Contalist email settings page. Log into Contalist and go to Settings > Email settings page, you can add your email account or set up the SMTP service at the 'Email Service' tab.
This could be one of the most tricky tasks in our PowerUp. Don't hesitate to contact us if you need any help.
Only email messages? What about text messages?
Yes, you can send text messages too. You need to enable our Twilio plugin, and sign up for a Twilio account if you don't have one.
Twilio is popular messaging service, you can get more information on it's website https://www.twilio.com.
Send and schedule messages with automation
Send a notification to the client when I move the card into 'Ready to ship' list
When I move the order into the 'Ready to ship' list, send a notification message to Chris, telling him the order's status is changed to 'Ready to ship'
Go to the Setup page, and click the Automation tab, then click the Create an automation button to open the automation form. And fill the form like this.
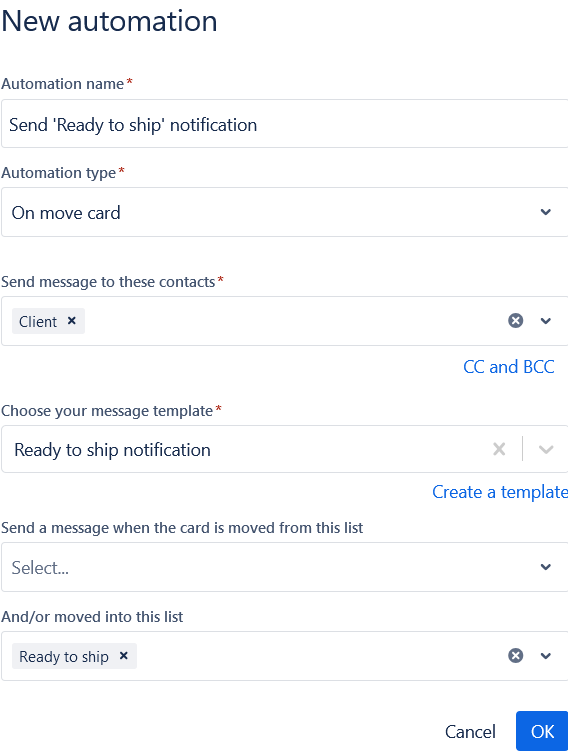
Save your automation by clicking the OK button. Now click the Start automation toggle in the top right corner to enable automation for this board. This is important, the automation will not be run unless automation is enabled.
Now if you move the card for Chris's order into the list 'Ready to ship', an email notification will be sent to Chris.
Automation form explained
| Field | Description |
|---|---|
| Automation name | Name of the automation |
| Automation type | Now we have three type of automations - on moving a card, on comment and scheduled messages based on due date |
| Send message to these contacts | Choose the contact roles that the message should be sent to. And you can add more recipients with CC and BCC |
| Choose your message template | Set the message template for the generated message |
| For automation of type On move card | |
| Send a message when the card is moved from this list | Send the message when your card is moved awasy from this list |
| And/Or moved into this list | Send the message when your card is moved into this list |
| For automation of type Scheduled message | |
| Only run this automation when the card is in these lists | When you set or change the card's due date, the automation will be run if it's in the specified lists |
| Choose your message template | Generate the message from this message template |
| When to send this message | Based on the due date, we can send the message X days before or after the due date |
Now you have seen how the features can help. It can help your daily workflow a lot, use it creatively!
If you need any help
Please contact us at support@contalist.com if you have any question or feedback.
To check this guide again later, click the Contalist button in the top right corner of your board, then click Help in the dropdown list.